Are you tired of cluttered countertops and overflowing spice cabinets? Do you crave a stylish and organized way to display your culinary treasures? Then look no further! This tutorial shows you how to create a stunning, over-the-stove spice rack using reclaimed pallet wood – a project that’s both budget-friendly and surprisingly quick. Forget expensive, mass-produced spice racks; with just a few simple tools and readily available materials, you can craft a unique and personalized addition to your kitchen. This project is perfect for beginners and offers a fantastic way to upcycle materials while adding a touch of rustic charm to your cooking space.
This DIY project requires minimal carpentry skills and can be completed in a single afternoon. We'll guide you through each step, from selecting the perfect pallet wood to the final finishing touches, ensuring a beautiful and functional spice rack you'll be proud to display. Ready to get started? Let's dive into the step-by-step instructions!
Preparation and Safety Guidelines
- Pallet wood
- 80 grit sandpaper
- Power sander (optional)
- Hand saw (optional)
- Hand sandpaper (optional)
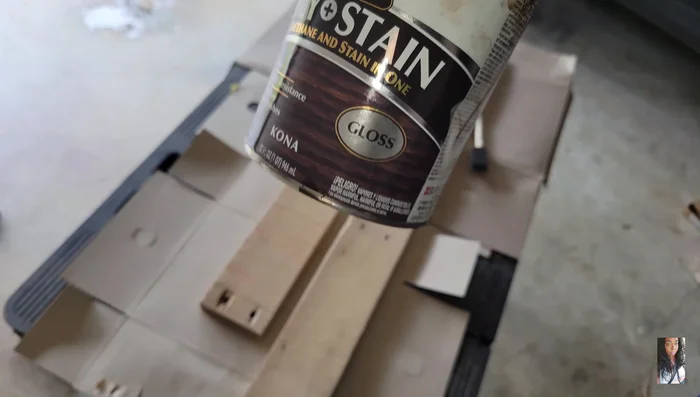
- Verithane Polystain (Kona color)
- Sponge brush
- Nail gun
- Fine nails
- Always wear safety glasses when working with wood, especially when sawing or sanding. Wood splinters and dust can cause eye injuries.
- Ensure the pallet wood is clean and free from any harmful chemicals or treatments before use. Old pallets may contain pesticides or other substances.
- Use caution when working with tools. Follow the manufacturer's instructions and use appropriate safety equipment, such as gloves, when necessary.
Step-by-Step Instructions
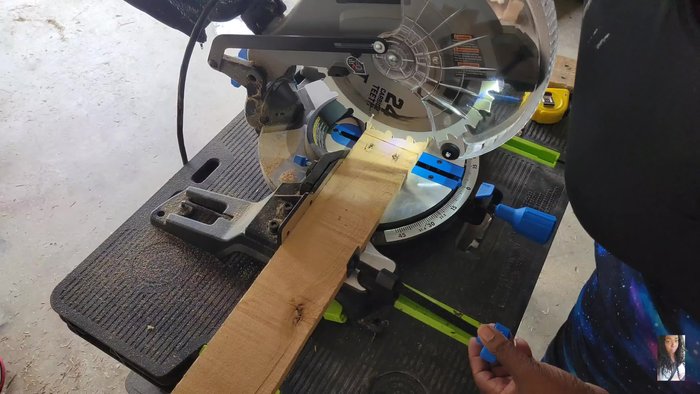
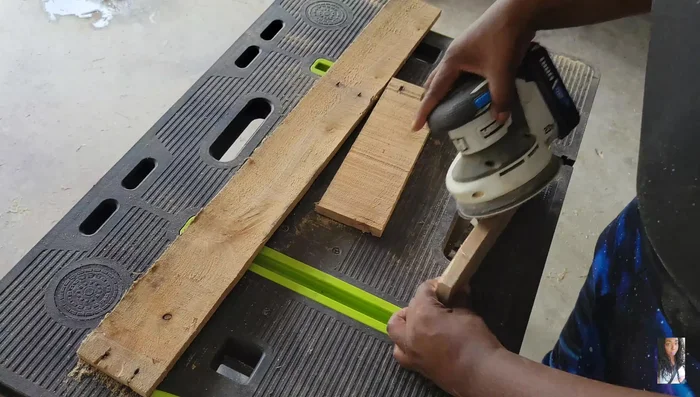
Prepare the Pallet Wood
- Measure and cut pallet wood to the appropriate height and length for your stove.
- Sand the pallet wood thoroughly using 80 grit sandpaper to achieve a smooth surface, removing splinters and roughness.

Prepare the Pallet Wood Stain and Dry
- Apply Verithane Polystain (Kona color or your preferred color) using a sponge brush for even coverage. Allow one hour to dry.
Stain and Dry Assemble the Spice Rack
- Use a nail gun to attach the wood pieces to create the spice rack structure. Use fine nails and ensure stability.
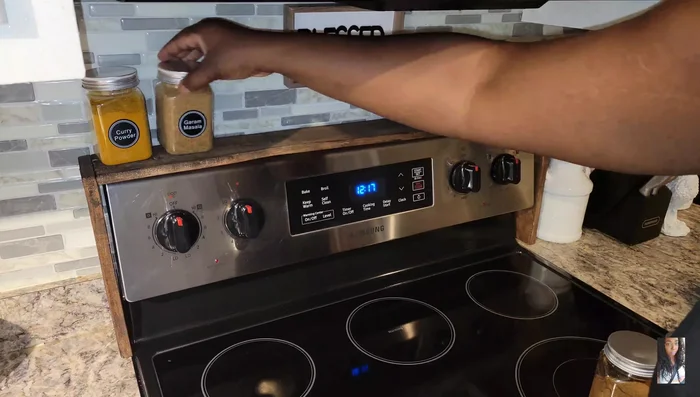
Assemble the Spice Rack Install and Check
- Position the completed spice rack over your stove and check for stability.
Install and Check

Read more: Build a Stunning Black Walnut Coaster Set: The Ultimate Furniture Protector
Tips
- Using power tools like a sander significantly speeds up the sanding process, making it easier and quicker.
- Verithane Polystain provides a rich, flawless finish.
- Check for and fill in any missed spots during the staining process.